Manual in PDF format
1. NET Genium installation procedure
2. Server settings
3. Installing IIS
3.1 Installing IIS on Windows Server 2022
4. IIS settings
4.1 Pin IIS to the taskbar
4.2 Turn off logging
4.3 Turn off recycling
4.4 Idle timeout setting
4.5 Identity settings
4.6 Default site directory
4.7 Set default directory permissions
4.8 Creating a new site
4.9 Creating and installing SSL certificates
5 Download and unzip NET Genium to the destination directory
6 Database server installation – Firebird or MS SQL
7 Installing NET Genium
7.1 NET Genium installation via “Setup.exe”
7.2 NET Genium installation “IIS”
7.3 Additional settings
8 Authentication settings
8.1 Anonymous approach
8.2 Windows authentication
8.3 Combined approach
8.3.1 Setting up combined access using two virtual directories
8.3.2 Setting up combined access using one virtual directory
9 Problem solving
9.1 NET Genium installation via “Setup.exe”
9.2 Windows authentication
9.3 The first launch of NET Genium
9.4 NET Genium display issues after installing or importing a new SSL certificate
1. NET Genium installation procedure
- Server settings
- IIS installation and setup
- Download and unzip NET Genium to the destination directory
- Installation of Firebird database server (or MS SQL Server)
- Installing NET Genium
- File indexing settings for Windows Search
- SMTP Server installation
- Firewall settings
2. Server settings
- NET Genium text configuration files or print templates in the “txt” or “html” format require the appropriate region settings according to the customs of the Czech Republic in order to load accents correctly.
- From the “Start” menu click “Settings”.

- Select “Time & Language”.

- Select “Region” and click on “Additional date, time, & regional settings”.

- Select “Change date, time, or number formats”.

- On the “Formats” tab, select “Czech (Czechia)”.

- On the “Administrative” tab, select “Change system locale…” and select “Czech (Czechia)”.

3. Installing IIS
- All actions must be performed under administrator rights.
- Install the necessary services and tools that NET Genium uses (IIS – Internet Information Services) and Windows Search if you will be doing full-text searches in NET Genium.
3.1. Installing IIS on Windows Server 2022
- From the “Start” menu, search for “Server manager”.

- Next, select “Add roles and features”.

- In the “Installation Type” window, select the “Role-based or feature-based installation” option and click the “Next” button.

- In “Server Selection”, select the server on which you want to install IIS – “Select a server from the server pool” and click the “Next” button.

- Select the following server roles from the “Server Roles” menu. If the system asks you to install additional services or features to a specific part of IIS, install them.
- Web Server (IIS))

- Click the “Next” button.
- Select features from the “Features” menu:
- .NET Framework 3.5 Features
- .NET Framework 3.5
- .NET Framework 4.8 Features
- .NET Framework
- ASP.NET 4.8
- Windows Search Service
- .NET Framework 3.5 Features


- Click the “Next” button.
- From the Web Server Roles (IIS) - Role Services menu, select:
- Web Server
- Common HTTP Features
- Default Document
- HTTP Errors
- Static Content
- HTTP Redirection
- Security
- Windows Authentication
- Management Tools
- IIS 6 Management Console
- IIS 6 Management Compatibility
- Common HTTP Features
- Web Server

- Click the “Next” button.
- In the “Confirmation” menu, click “Install”.

4. IIS settings
4.1. Pin IIS to the taskbar
- Find “Internet Information Services (IIS) Manager” in the “Start” menu.

- In the bottom bar, right-click on IIS and select “Pin to taskbar”.

4.2. Turn off logging
- To prevent unexpected server disk fill-up, it is advisable to disable IIS traffic logging within your server node.
- Go to IIS settings and select the top node of your server (for example, “VM8193”) so that the settings are propagated to other child nodes, and in the “IIS” section, select “Logging”.

- Then, in the “Actions” panel on the right side of the window, click “Disable”. This will turn off logging of your server traffic.

4.3. Turn off recycling
- To prevent unexpected restarts of NET Genium, it is necessary to disable the so-called “recycling” of application pools (terminating the w3wp.exe process) on the web server. This will prevent the regular restart of application pools that IIS has set up by default.
4.3.1. Disabling recycling via application pool preferences
- Go to “Application Pools” and in the “Actions” section click “Set Application Pool Defaults...”, or right-click on the IIS desktop and select “Set Application Pool Defaults...”.
- This way, you change the default settings for all application pools so that you don't have to configure each application pool separately.

- In the “Application Pool Defaults” section, go to the “Recycling” section and set the “Regular Time Interval” to “0.” Click the “OK” button.

4.3.2. Disabling recycling for individual application pools
- If recycling was disabled through the application pool preferences listed in the previous chapter, you only need to check that it is disabled.
- Go to “Application Pools” and right-click on “DefaultAppPool” and select “Recycling…”.

- In the newly opened window, make sure to deselect the “Regular time intervals” item, click the “Next” button, and then the “Finish” button.

4.4. Idle timeout setting
- Idle time is the interval at which the application pool automatically shuts down when web applications are idle (no requests from site visitors).
4.4.1. Set an idle timeout through application pool preferences
- Go to “Application Pools” and click on “Set Application Pool Defaults” in the “Actions” section, or right-click on the IIS desktop and select “Set Application Pool Defaults”.
- This way you change the default settings for all application pools so that you do not have to set each application pool separately.

- In the “Process Model” section, set the “Idle Time-out” to 1440 minutes (one day) and click the “OK” button.

4.4.2. Setting the idle timeout for individual application pools
- If the idle timeout has been set through the application pool preferences, which are listed in the previous chapter, you only need to check its settings.
- Go to “Application Pools” and right-click “DefaultAppPool” and select “Advanced Settings”.

- In the “Process Model” section, set the “Idle Time-out” to 1440 minutes (one day).

4.5. Identity settings
4.5.1. Identity settings via application pool preferences
4.5.1.1. Predefined “NetworkService” account
- The standard settings of “DefaultAppPool” are described below, when the database server is installed on the same computer as the application itself, resp. IIS.
- Go to “Application Pools” and set “Application Pool Defaults” in the “Actions” section, or right-click on the IIS desktop and select “Set Application Pool Defaults”.
- This way you change the default settings for all application pools so that you do not have to set each application pool separately.

- Select “Identity” and click on the three dots on the right in the dialog.

- Select and set “NetworkService” from the list.

4.5.1.2. Own technology account
- We typically set up our own technology account when the database server is installed on a different computer than the application itself, or IIS. Otherwise, we leave the identity set to "NetworkService".
- Go to “Application Pools” and “Set Application Pool Defaults” in the “Actions” section, or right-click on the IIS desktop and select “Set Application Pool Defaults”.
- This way you change the default settings for all application pools so that you do not have to set each application pool separately.

- Select “Identity” and click on the three dots on the right in the dialog.

- Check “Custom account” and click on the “Set…” button.

- Set the “User name” to, for example, “AD\svcngadmin”, select the “Password” and click the “OK” button.

4.5.2. Identity settings for individual application pools
- If the identity has been set through the application pool preferences, which are listed in the previous chapters, you only need to check its settings.
4.5.2.1. Predefined “NetworkService” account
- The standard settings of “DefaultAppPool” are described below, when the database server is installed on the same computer as the application itself, resp. IIS.
- To set the identity, right-click on “DefaultAppPool” and select “Advanced Settings…”.

- Select “Identity” and click on the three dots on the right in the dialog.

- Select and set “NetworkService” from the list.

4.5.2.2. Own technology account
- We typically set our own technological account in the case when the database server is installed on a different computer than the application itself, resp. IIS. Otherwise, we leave the identity setting to “NetworkService”.
- To set the identity, right-click on “DefaultAppPool” and select “Advanced Settings…”.

- Select “Identity” and click on the three dots on the right in the dialog.

- Check “Custom account” and click on the “Set…” button.

- Set the “User name” to, for example, “AD\svcngadmin”, select the “Password” and click the “OK” button.

4.6. Default site directory
- The default site directory, or root, is the directory on the disk where the tree structure of subdirectories and files within a site is stored. By default, a clean installation of IIS creates a single site named “Default Web Site” that has “C:\inetpub\wwwroot” set as the default site directory. The default site directory settings can be changed, so it is up to the administrator to decide which directory to choose as the default site directory. Any number of sites can be created in IIS, with each site having its own default site directory.
- If you want to change the default site directory, follow the instructions below.
- Open the “Internet Information Services” application and right-click on the “Default Web Site” and select “Manage Website” –> “Advanced Settings…”.

- Change the set physical path to the path you selected and click the “OK” button.

4.7. Set default directory permissions
- This step is important so that your NET Genium can write files to disk (for example, file attachments, cascading styles, log files, etc.).
- Before setting the authorization itself, it is important to realize under which account the application pool is configured, see the chapter “Identity settings”, and therefore for which account we will set the authorization. Whether it is a predefined “NetworkService” account or your own technology account. The procedure below describes how to set permissions for the “NetworkService” account. This procedure also changes the default permissions for all other subdirectories.
- Go to the location of your default web directory, for example “C:\inetpub”, right-click on the “wwwroot” folder and select “Properties”.

- Go to the “Security” tab and click on the “Edit…” button.

- Click on the “Add” button.

- Then click on the “Advanced…” button.

- Search for “NETWORK SERVICE” via the “Find Now” button and click the “OK” button.

- Highlight the “NETWORK SERVICE” user group, check “Full control” and confirm with “OK”.

- If it is not possible to set the permissions of the default directory, follow the steps given in the chapter Installing NET Genium via “Setup.exe”.
4.8. Creating a new site
- By default, a clean installation of IIS creates a single site named “Default Web Site” that has “C:\inetpub\wwwroot” set as the default site directory.
- In IIS, right-click on “Sites” and select “Add Website…”.

- In the newly opened window fill in:
- “Site name”: “www.netgenium.com”
- “Application pool: ”DefaultAppPool“
- ”Physical path: “C:\inetpub\wwwroot\www.netgenium.com”
- “Type: ”http“
- ”Host name: “www.netgenium.com”
- Click the “OK” button.

4.9. Creating and installing SSL certificates
- The setting described in this chapter is intended only for the use of web servers exposed on the Internet, where communication security is expected via an SSL certificate.
4.9.1. Create an SSL certificate request
- Go to IIS settings and select the node of your server (for example “VMP8193”) and select “Server certificates” in the “IIS” section.

- In the right part of the window, in the “Actions” panel, click on “Create Certificate Request...”.

- In the newly opened window, enter all the required information for the certificate and click the “Next” button.
- “Common name”: “www.netgenium.com”
- “Organization”: “NetGenium”
- “Organization unit”: “IT”
- “City/locality”: “Prague”
- “State/province”: “Czech Republic”
- “Country/region”: “CZ”

- In the next step, set the bit length to “2048” and click the “Next” button.

- Specify a file name for the certificate request and click the “Finish” button.

4.9.2. Communication with the Certification Authority
- Sending a technical request for a certificate to the Certification Authority
- The Certification Authority sends the issued certificate to the applicant
4.9.3. Completing the SSL certificate request
- Once you receive your certificate from a certification authority (e.g. www.sslmarket.cz), save it to a text file such as “C:\Users\Administrator\Desktop\netgenium.txt”. If you obtain the certificate by copying the certificate content from an e-mail message, for example, it is important to save the content including the -----BEGIN CERTIFICATE----- and -----END CERTIFICATE------ tags.
- Go to IIS settings and select your server node (for example “VM8193”) and select “Server Certificates” in the “IIS” section.

- In the right part of the window, in the “Actions” panel, click on “Complete Certificate Request…”.

- In the wizard, enter the location and name of the certificate you previously saved on your server, enter “Friendly name” and select “Certificate store for the new certificate” to “Personal”. Then click the “OK” button.
- “Friendly name” is not part of the certificate but is entered by the administrator to better identify the certificate among others.

- After successfully installing a certificate on the server, you need to assign this certificate to a specific site using IIS.

- From the “Connections” menu, select the website to which you want to assign the certificate in the “Internet Information Services” main window.
- Right-click on the website and select “Edit Bindings…”.

- In the newly opened window, click on the “Add…” button.

- The following dialog box “Add Site Binding” will open.
- Fill in the following information:
- “Type”: “https”
- “IP adress”: “All Unassigned”
- “Ports”: “443”
- “Host name”: fill in the website domain name (for example www.netgenium.com)
- “SSL certificate”: select the SSL certificate you want to assign to this website in the drop-down list

- Option “Require Server name Indication”
- Do not check “Require Server name Indication” if this is the default site you run on that server. Within one IP address (or within the whole IIS, if we use an IP address set to “All Unassigned”), only one SSL certificate can be defined, which has this option unchecked and which we therefore consider as the default.
- Check “Require Server name Indication” if it is a second or additional SSL site running on the same IP address. It is important to note that older client devices (older Windows, tablets or mobile phones) can communicate with only one SSL certificate on one IP address. However, all the usual modern equipment today can so-called. SNI (Server Name Indication), which allows you to run multiple SSL certificates on one IP address. To enable this feature, check “Require Server name Indication”.
5. Download and unzip NET Genium to the destination directory
- Download the archive with the latest full version of NET Genium from the URL:
“https://www.netgenium.com/download/netgenium4.zip”. - Extract the contents of the archive to the location “C:\inetpub\wwwroot\netgenium”.
6. Database server installation – Firebird or MS SQL
- Before installing NET Genium, you need to install a database server, either Firebird or MS SQL Server. After installing the database server, you can continue installing NET Genium.
- For instructions on installing Firebird, see the “Installing Firebird” manual.
- For instructions on installing MS SQL Server, see the “Installing MSSQL” manual.
7. Installing NET Genium
- NET Genium can be installed in two different ways:
- Via “Setup.exe”
- Via “IIS”
7.1. NET Genium installation via “Setup.exe”
- Run the “Setup.exe” program, which is located in the “bin” directory of NET Genium. After its first run, only the libraries will be created for it to run properly, then run “Setup.exe” again (“Setup.exe” must be run as an administrator).
- If you have a NET Genium license, copy your license file “license.txt” to the “Config” directory of NET Genium.
- The introductory window of the program looks like this:

- Check the options you want to select as described below:
- “Create virtual directory”
- Check this option if you want to convert the NET Genium directory on disk to the IIS virtual directory (run the equivalent of a manual NET Genium installation performed in IIS).
- “Authorize a NetworkService account to write in the NET Genium directory”
- Check this option if you want to set the rights for the “NetworkService” account to full access to the NET Genium directory. If you have set the rights according to the chapter “Setting the permissions of the default directory” for the entire “wwwroot”, it is not necessary (if this option is checked) to set the rights individually. Thus, the rights for each individual NET Genium are already preset.
- “Create database”
- Check this option if you want to create a new database and your database server is located on the same computer as the application itself, resp. IIS. If the database server is located on another computer, the database on the database server must be created manually, and then the “ConnectionString.txt” file must be created in the “Config” directory of NET Genium, which contains the definition of the connection string to the database.
- Specify what type of database you will use – Firebird or MS SQL Server.
- Leave the “Automatic” option checked – the database will have the same name as the virtual directory or specify your own database name.
- In the case of Firebird, select the directory where the database is to be stored (the default location is “C:\Firebird”).
- In the case of MS SQL Server, select the instance in which the database will be created.
- “Authorize NetworkService account to access MS SQL database”
- Check this option if you use an MS SQL database and your database server is located on the same computer as the application itself, resp. IIS.
- Authorization consists of creating a login to the “NetworkService” account and assigning the “sysadmin” role.
- “Create a scheduled task for BackupServer.exe”
- Check this option if you want to automatically create a scheduled task for regular server and database backups.
- “Create a scheduled task for SqlBackup.exe (database backup)”
- Check this option if you want to automatically create a scheduled task for regular database backups.
- “Create a scheduled task for FileBackup.exe (attachment backup)”
- Check this option if you want to automatically create a scheduled task for regular file attachment backups.
- “Create a scheduled task for Update.exe”
- Check this option if you want to automatically create a scheduled task for regularly updating NET Genium to the new version.
- “Create a scheduled task for ResendEmlFiles.exe”
- Check this option if you want to automatically create a scheduled task for regularly sending unsuccessful e-mails from the “Logs” directory.
- “Create a scheduled task for RunScript.exe”
- Check this option if you want to automatically create a scheduled task to run a script with a given ID, at a specified time, or with the option to repeat the task regularly twice an hour for 18 hours.
- Click on the “Set up” button to start the installation. When the installation is complete, the program displays a message about this fact.
- After successful creation of the database, the file “ConnectionString.txt” is created automatically.
- A “DefaultLanguage.txt” file is created in the “Config” directory, in which the abbreviation of the default portal language is placed. This will be the default language according to which all subsequently created NET Genium applications will be created.
7.2. NET Genium installation via “IIS”
- Only install via IIS if you have a NET Genium database created and you have a “ConnectionString.txt” file in the “Config” directory, which contains the definition of the connection string to the database.
- Find “Internet Information Services (IIS) Manager” via the “Start” menu.

- In the open window on the left, click on the tree structure of the drop-down list up to “Default Web Site”, select the directory on your NET Genium's disk, right-click on it, and select “Convert to Application” from the menu.
- This step assumes that NET Genium is expanded in the “netgenium” directory in the default site directory (for example, “C:\inetpub\wwwroot\netgenium”). See the chapter “Downloading and unzip NET Genium to the destination directory”.

7.3. Additional settings
7.3.1. File indexing settings for “Windows Search”
7.3.1.1. Enabling the “Windows Search” service
- Find “Services” via the “Start” menu.

- Right-click on “Windows Search” and select “Properties”.

- Set “Startup type” to “Automatic”) and confirm the changes by pressing the “OK” button.

- If the original “Startup type” was “Disabled”, open “Windows Search” again via “Properties” and click the “Start” button. Then click the “OK” button.

7.3.1.2. File indexing settings for “Windows Search”
- “Control Panel” via the “Start” menu.

- In the control panel, type “index” into the search box. Select “Indexing Options” from the results found.

- In the newly opened “Indexing Options” window, click on the “Modify” button.

- A window will open where you can select the locations you want to include in the index. Check the box next to the NET Genium “Files” directory. In the last step, click the “OK” button.

- For Windows Search, you can check which file types are included in the index. For example, to check whether the “pdf” files are actually indexed, click on the “Advanced” button.

- In the new dialog window, click on the “File Types” tab and check the “pdf” files.

8. Authentication settings
- Authentication settings can be set for 3 types of access (login) to your NET Genium.
- Anonymous access is used when you want to connect to your NET Genium either over the Internet or over an internal computer network, and you do not require automatic user authentication using the integrated IIS features.
- Windows authentication is used when you want to connect to your NET Genium either over the Internet or over an internal computer network and require automatic user authentication using the integrated IIS features.
- In this configuration, it is not possible to access NET Genium anonymously via the Internet or via an internal computer network.
- Client stations must have the NET Genium address set in the intranet zone, see the “Web browser settings” manual.
- Combined access is used when we need to use a combination of anonymous access and Windows authentication.
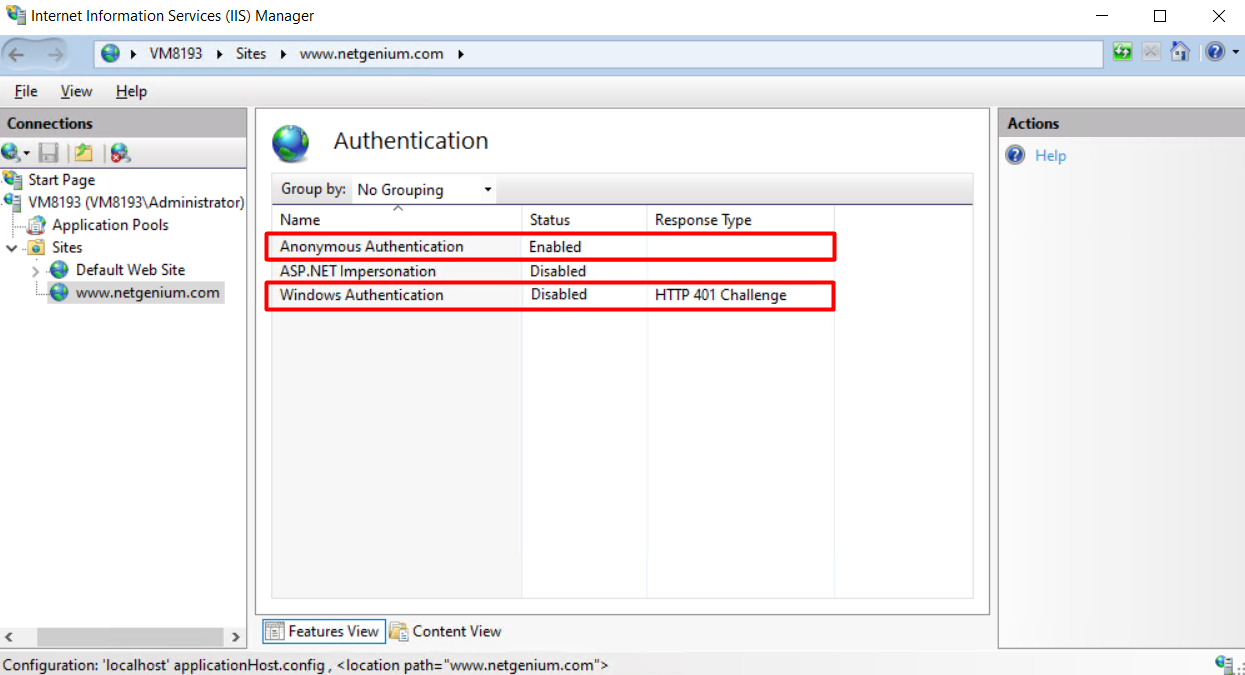
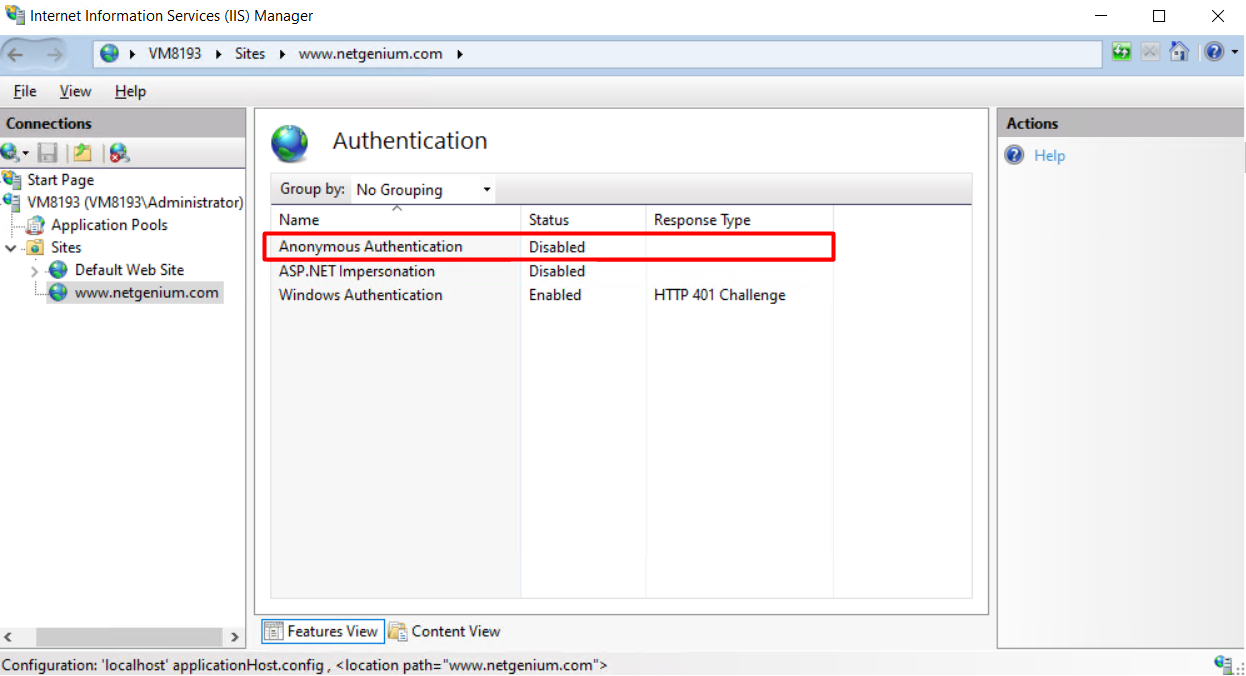
8.1. Anonymous approach
- Anonymous access is used when you want to connect to your NET Genium either over the Internet or over an internal computer network, and you do not require automatic user authentication using the integrated IIS features.
- Before setting up authentication in IIS, it is important to know whether to set the authentication type for the entire site or just for the virtual directory. Below is the procedure for the entire site.
- Go to IIS settings, select the target website, and in the “IIS” section, select “Authentication”.

- In the “Authentication” section, select “Anonymous Authentication” and in the “Actions” section, click on “Enable” to set the resulting status to “Enabled”.
- In the “Authentication” section, select “Windows Authentication” and in the “Actions” section, click on “Disable” to set the resulting status to “Disabled”.
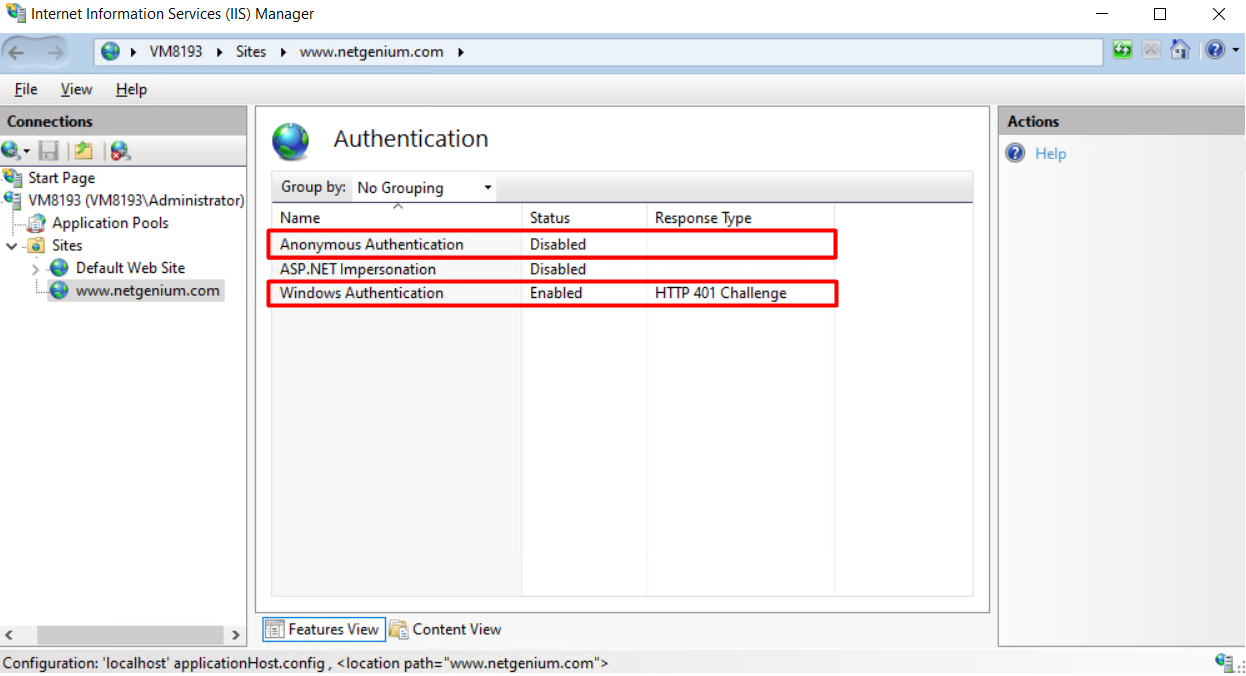
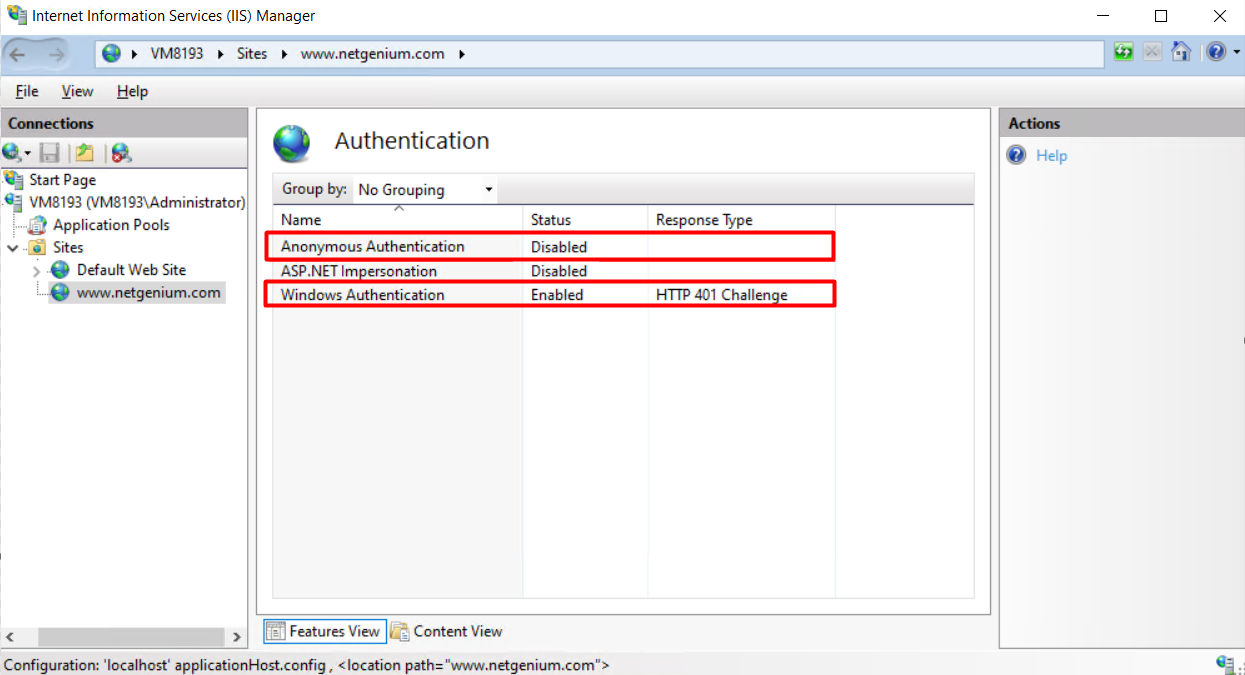
8.2. Windows authentication
- Windows authentication is used if you want to connect to your NET Genium either over the Internet or over an internal computer network, and you require automatic user authentication using the built-in IIS features.
- In this configuration, it is not possible to access NET Genium anonymously via the Internet or via an internal computer network.
- Client stations must have the NET Genium address set in the intranet zone, see the “Web browser settings” manual.
- Before setting up authentication in IIS, it is important to know whether to set the authentication type for the entire site or just for the virtual directory. Below is the procedure for the entire site.
- Go to IIS settings, select the target website, and in the “IIS” section, select “Authentication”.

- In the “Authentication” section, select “Windows Authentication” and in the “Actions” section, click on “Enable” to set the resulting status to “Enabled”.
- In the “Authentication” section, select “Anonymous Authentication” and in the “Actions” section, click on “Disable” to set the resulting status to “Disabled”.
8.3. Combined approach
- Combined access is used when we need to use a combination of anonymous access and Windows authentication.
- There are two ways to set up combined access to NET Genium:
- Using two virtual directories, one of which is set up for Windows authentication and the other for anonymous access (NET Genium is accessed via two different URLs).
- Using one virtual directory (NET Genium is accessed via one URL).
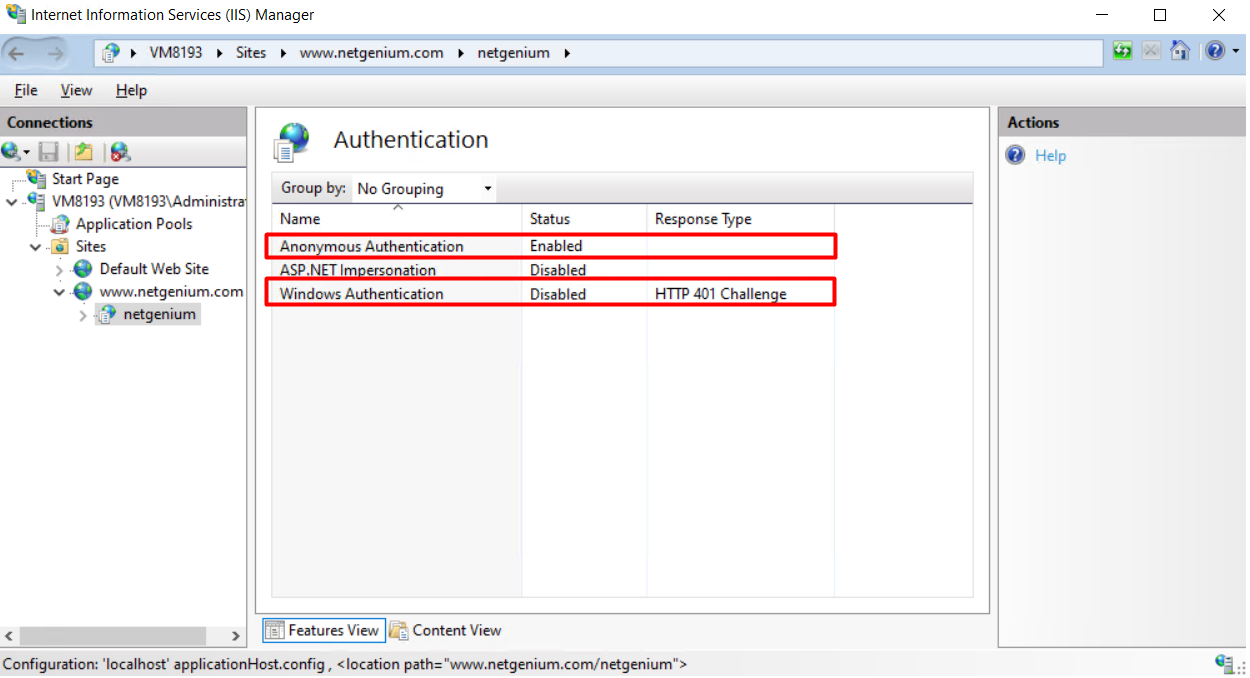
8.3.1. Setting up combined access using two virtual directories
- The usual practice with this configuration is that the target website has its default website directory set to the directory on disk where NET Genium itself is stored. This website has Windows authentication set up. In addition, a new virtual directory is created that has anonymous login set up and points to the same disk location as the target website itself.
8.3.1.1. Setting the target website to use Windows authentication
8.3.1.2. Create a second virtual directory for anonymous access
8.3.1.3. Setting up virtual directory URLs in NET Genium portal settings
8.3.1.1. Setting the target website to use Windows authentication
- Go to IIS settings, select the target website, and in the “IIS” section, select “Authentication”.

- In the “Authentication” section, select “Windows Authentication” and in the “Actions” section, click on “Enable” to set the resulting status to “Enabled”.
- In the “Authentication” section, select “Anonymous Authentication” and in the “Actions” section, click on “Disable” to set the resulting status to “Disabled”.
8.3.1.2. Create a second virtual directory for anonymous access
- Right-click on the target website and select “Add Application…”.

- Fill in:
- “Alias”: for example “netgenium”
- “Application Pool”: “DefaultAppPool”
- “Physical path”: for example “C:\inetpub\wwwroot\netgenium” (physical path (directory on disk) where your NET Genium is stored)

- Click on the “netgenium” application and select “Authentication” in the “IIS” section.

- In the “Authentication” section, select “Anonymous Authentication” and in the “Actions” section, click on “Enable” to set the resulting status to “Enabled”.
- In the “Authentication” section, select “Windows Authentication” and in the “Actions” section, click on “Disable” to set the resulting status to “Disabled”.
8.3.1.3. Setting up virtual directory URLs in NET Genium portal settings
- This step is important so that administrator modifications in individual NET Genium instances are synchronized with each other (virtual directory with Windows authentication vs. virtual directory with anonymous access).
- Start your NET Genium.
- Go to the NET Genium portal settings (via the gear symbol).

- In the newly opened dialog box, go to the “General” tab and enter both URL addresses of your NET Genium in the “URL” field (for example: “http://localhost;http://localhost/netgenium”). Confirm the changes with the “Save” button.

8.3.2. Setting up combined access using one virtual directory
8.3.2.1. Setting up the target website for two-factor authentication
8.3.2.2. Setting the “LoginByIdentity.aspx” file for Windows authentication
8.3.2.3. Creating the “LoginByIdentity.txt” file
8.3.2.1. Setting up the target website for two-factor authentication
- Before setting up authentication in IIS, it is important to consider whether we will set the authentication type for the entire website or just for the virtual directory. Below is the procedure for the entire website.
- Go to IIS settings, select the target website, and in the “IIS” section, select “Authentication”.

- In the “Authentication” section, select “Anonymous Authentication” and in the “Actions” section, click on “Enable” to set the resulting status to “Enabled”.
- In the “Authentication” section, select “Windows Authentication” and in the “Actions” section, click on “Enable” to set the resulting status to “Enabled”.

8.3.2.2. Setting the “LoginByIdentity.aspx” file for Windows authentication
- Right-click on the target website and select “Switch to Content View”.

- Locate the “LoginByIdentity.aspx” file, right-click on it and select “Switch to Features View”.

- In the “IIS” section, select the “Authentication” option.

- In the “Authentication” section, select “Anonymous Authentication” and in the “Actions” section, click “Disable” to set the resulting status to “Disabled”.
8.3.2.3. Creating the “LoginByIdentity.txt” file
- Go to the directory where you have installed your NET Genium (for example “C:\inetpub\wwwroot\netgenium”) and in the “Config” directory create the file “LoginByIdentity.txt” (the content of the file does not matter).
9. Problem solving
9.1. NET Genium installation via “Setup.exe”
- If you encounter any problems while installing NET Genium with the “Setup.exe” program, their details can be found in the “Logs” directory in the “Install.log” file. These problems include:
- Problem: IIS is not installed.
- Solution: Install IIS (see chapter “Installing IIS”).
- Problem: The selected database system is not installed.
- Solution: Install the database server (see chapter “Database server installation – Firebird or MS SQL”).
- Problem: When creating the setup database, it reports an error: “Firebird: connection rejected by remote interface ”.

- Solution: Check which version of Firebird you have installed. Version 2.5.n or higher must be installed.
- Problem: Backward compatibility with IIS 6 and .NET and ASP.NET extensions is not installed.
- Solution: Install the relevant missing extensions by installing Server Features.
9.2. Windows authentication
- Problem: Windows authentication does not work.
- Solution: Make sure you have a NET Genium address on the client stations located in the Intranet zone.
- Solution: Make sure you have “Windows Authentication” installed, see chapter “Authentication settings”
- Solution: Check the authentication settings according to your chosen type of access to NET Genium (see chapter “Authentication settings”).
9.3. The first launch of NET Genium
- Problem: NET Genium is displayed without styles.
- Solution: If your NET Genium is displayed without styles, you either do not have the permissions set for your default website directory (see the chapter “Set default directory permissions” or you did not check the “Static Content” option when installing IIS (see the chapter “Installing IIS on Windows Server 2022”).

- Problem: Unable to save form in NET Genium. Error saving form: “No message for error code 335544865 found ”.
- Solution: Make sure you have FlameRobin running. If so, close the program.
9.4. NET Genium display issues after installing or importing a new SSL certificate
- Problem: Your connection is not private: NET :: ERR_CERTIFICATE_TRANSPARENCY_REQUIRED


- Solution: Contact the certificate issuer, resp. the certification authority that issued the certificate and have it verified that the certificate has been correctly logged in accordance with “Certificate Transparency” after it has been generated. See the site for more https://comodosslstore.com/resources/how-to-fix-neterr_certificate_transparency_required-error-in-google-chrome/.